Is your bedroom a chaotic mess that leaves you feeling stressed and overwhelmed? You’re not alone. Many of us struggle with cluttered spaces, especially in the room where we should feel most relaxed. But don’t worry – with these 10 simple steps, you can transform your bedroom into a serene oasis in just one weekend. Let’s dive into the world of bedroom organization and discover how to declutter your bedroom effectively.
Introduction
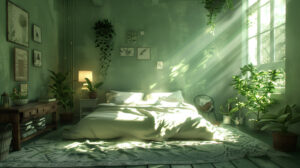
Imagine walking into your bedroom and feeling instantly calm. No piles of clothes on the floor, no overstuffed drawers, just a clean, organized space that welcomes you. Sounds like a dream, right? Well, it’s time to make that dream a reality.
Decluttering your bedroom isn’t just about creating a pretty space (although that’s a nice bonus). It’s about improving your quality of life. A clutter-free bedroom can lead to better sleep, reduced stress, and increased productivity. Who wouldn’t want that?
In this article, we’ll walk you through 10 simple steps to declutter your bedroom in one weekend. These quick and efficient methods will help you create the organized space you’ve always wanted. Plus, we’ll share tools and strategies to maintain your newly decluttered bedroom long after the weekend is over.
Ready to roll up your sleeves and get started? Let’s go!
Key Takeaways:
– Learn quick and efficient methods to declutter your bedroom
– Discover the benefits of a clutter-free space
– Gain tools and strategies to maintain an organized bedroom
Step 1: Set Your Goals
Before you start tossing things into boxes, take a moment to define what decluttering means to you. Are you aiming for a minimalist bedroom, or do you just want to be able to see your floor again? There’s no right or wrong answer here – it’s all about what works for you.
Close your eyes and visualize your ideal bedroom. What does it look like? How does it make you feel? This mental image will be your North Star throughout the decluttering process.
Now, let’s get practical. Create a checklist of what you want to achieve this weekend. It might look something like this:
– Clear out under-bed space
– Organize closet
– Sort through dresser drawers
– Declutter nightstand
Having a clear list will help you stay focused and motivated. Remember, Rome wasn’t built in a day, and your perfect bedroom won’t be either. Be realistic about what you can achieve in a weekend, and don’t be too hard on yourself if you don’t tick everything off your list.
Step 2: Gather Your Supplies
Before you dive into the decluttering process, make sure you have all the necessary tools at hand. Trust me, nothing kills decluttering momentum like having to run to the store mid-project!
Here’s what you’ll need:
– Boxes (for donations and storage)
– Trash bags
– Cleaning supplies (all-purpose cleaner, microfiber cloths, vacuum)
– Labeling materials (marker, sticky notes, or a label maker if you’re feeling fancy)
– Storage solutions (we’ll get into specifics later)
Having these supplies ready will make the process smoother and more efficient. Plus, there’s something oddly satisfying about lining up your cleaning arsenal before battle – I mean, decluttering.
Pro tip: Use different colored boxes or sticky notes for different categories (keep, donate, trash). This visual system can make sorting much easier and quicker.
Step 3: Start with a Clean Slate
Alright, it’s time to rip off the Band-Aid. In this step, we’re going to remove everything from your bedroom. Yes, everything. I know it sounds daunting, but trust me, it’s worth it.
Start by taking all items off surfaces – clear your nightstand, empty your dresser top, and remove everything from your shelves. Then, move on to your closet and drawers. Finally, tackle any items stored under your bed or in corners.
As you’re removing items, give your room a thorough cleaning. Dust those neglected corners, vacuum under the bed, and wipe down all surfaces. There’s something psychologically refreshing about working in a clean space.
Now, step back and look at your empty room. How does it feel? For many people, this is a eye-opening moment. You might be surprised at how spacious your room actually is without all the clutter.
This clean slate gives you a chance to reassess your space. Maybe you’ll realize that your furniture arrangement isn’t optimal, or that you’ve been underutilizing certain areas. Use this opportunity to envision how you want your room to function and feel.
Remember, we’re not just decluttering – we’re creating a bedroom that serves you better. Keep this vision in mind as we move to the next step.
Step 4: Sort Your Belongings
Now comes the fun part (or the challenging part, depending on how you look at it). It’s time to sort through all your belongings. This is where the rubber meets the road in your declutter bedroom journey.
Create three main categories: keep, donate, and trash. You might also want a fourth “maybe” pile for items you’re unsure about, but try to keep this pile small.
As you sort, ask yourself these questions:
– Have I used this in the past year?
– Does it fit me/my space/my lifestyle now?
– Would I buy this again today?
– Does this item bring me joy or serve a specific purpose?
If the answer is no to these questions, it’s probably time to let the item go.
The one-year rule is a handy guideline: if you haven’t used something in the past year, chances are you won’t use it in the coming year. Of course, there are exceptions (like seasonal items), but this rule can help you make quicker decisions.
Don’t get bogged down in the “but what if” scenarios. You know, the “but what if I need this obscure kitchen gadget for that recipe I might make someday” thoughts. Be honest with yourself about what you actually use and need.
Remember, the goal isn’t to get rid of everything. It’s to create a space filled only with items that you use, love, or find beautiful. As William Morris said, “Have nothing in your house that you do not know to be useful, or believe to be beautiful.”
Step 5: Organize by Categories
Now that you’ve decided what to keep, it’s time to give everything a home. Grouping similar items together is a key principle of organization that will make your life much easier.
Start with your clothes. Group them by type: shirts, pants, dresses, etc. Within these categories, you might further organize by color or season. This not only looks pleasing but also makes it easier to find what you need.
Next, tackle your accessories. Gather all your jewelry, scarves, belts, and other accessories. Consider using drawer dividers or small boxes to keep these items neat and easily accessible.
Don’t forget about your miscellaneous items. Books, electronics, personal care items – all of these should have designated spots. Use desk organizers, drawer dividers, or small baskets to keep these items tidy.
As you organize, think about frequency of use. Items you use daily should be easily accessible, while things you use less often can be stored in harder-to-reach places.
Now, here’s where labeling becomes your best friend. Label your storage containers, shelves, or even sections of your closet. This might seem over-the-top, but trust me, it’s a game-changer. Labels not only help you find things quickly but also remind you (and others) where items belong.
Remember, the goal is to make your life easier. If your current organization system isn’t working, don’t be afraid to try something new. The best system is the one that you can maintain effortlessly.
Step 6: Utilize Storage Solutions
Now that you’ve sorted and categorized your belongings, it’s time to put them away efficiently. Smart storage solutions are the secret weapon in your declutter bedroom arsenal.
Let’s start with the often-overlooked under-bed space. This area is perfect for storing out-of-season clothes, extra bedding, or shoes. Invest in some under-bed storage containers with wheels for easy access. If your bed doesn’t have much clearance, consider bed risers to create more space.
Next, let’s tackle the closet. Over-the-door organizers are great for shoes, accessories, or even small clothing items. Hanging organizers can add vertical storage space for folded clothes or accessories. And don’t forget about the top shelf of your closet – use labeled boxes to store items you don’t use frequently.
For your dresser, drawer organizers are a game-changer. They keep your socks, underwear, and other small items neatly compartmentalized. You might even consider using file folding for your clothes – it saves space and lets you see all your options at a glance.
If you’re short on floor space, look up! Wall-mounted shelves can provide extra storage without taking up valuable floor real estate. Floating nightstands can replace bulky bedside tables, and a pegboard can be a versatile storage solution for everything from jewelry to small electronics.
Remember, the key to good storage is accessibility. Make sure you can easily get to the items you use most often. And don’t forget to leave some empty space – a jam-packed room will quickly feel cluttered again.
Step 7: Declutter Your Furniture
Now that we’ve tackled your belongings, it’s time to take a hard look at your furniture. In the quest to declutter your bedroom, less is often more.
Evaluate each piece of furniture in your room. Ask yourself:
– Does this piece serve a purpose?
– Is it the right size for the space?
– Does it fit with my ideal bedroom vision?
If a piece of furniture isn’t pulling its weight, consider removing it or replacing it with something more functional.
Speaking of functional, multi-purpose furniture can be a real space-saver. A bed with built-in storage, a dresser that doubles as a TV stand, or a bench with hidden storage at the foot of your bed can help maximize your space.
When it comes to furniture arrangement, think about flow. You should be able to move easily around your room without bumping into things. Try to create clear pathways and avoid blocking windows or doors.
Don’t be afraid to experiment with different layouts. Sometimes, simply rearranging your furniture can make your room feel brand new and more spacious.
Remember, your bedroom should be a restful retreat. If your furniture is making the space feel cramped or chaotic, it might be time for a change.
Step 8: Deal with Sentimental Items
Ah, sentimental items. These can be the trickiest part of any declutter bedroom project. That ratty t-shirt from your first concert, the stuffed animal you’ve had since childhood, the box of letters from your first love – these items carry emotional weight that can make them hard to part with.
Here’s the thing: it’s okay to keep some sentimental items. The key is to be selective and find ways to honor these memories without cluttering your space.
For items you decide to keep, consider creating a dedicated “memory box.” This could be a beautiful box or bin where you store your most treasured keepsakes. Limit yourself to what fits in this box to avoid accumulating too much.
For items you’re ready to let go of, think about ways to preserve the memory without keeping the physical object. Could you take a photo of the item? Could you upcycle it into something useful? Could you write about the memory associated with it in a journal?
Digital solutions can be great for preserving memories without taking up physical space. Scan old photos or letters, create digital photo albums, or use apps designed for cataloging memories.
Remember, letting go of an item doesn’t mean letting go of the memory associated with it. The memories live in you, not in your stuff.
Step 9: Maintain Your Decluttered Space
Congratulations! You’ve decluttered your bedroom. But here’s the truth: maintaining a clutter-free space is an ongoing process. Don’t worry, though – with a few simple habits, you can keep your bedroom organized without much effort.
First, adopt the “one in, one out” rule. For every new item you bring into your bedroom, remove one item. This helps prevent accumulation over time.
Make your bed every morning. It might seem small, but a made bed sets the tone for a tidy room and makes you less likely to toss clothes or other items on it throughout the day.
Develop a nightly “reset” routine. Spend just 5-10 minutes before bed putting things back in their place. This prevents small messes from becoming big ones.
Do a weekly quick tidy-up. Use this time to put away any items that have migrated to the wrong spots, dust surfaces, and assess if any areas are starting to accumulate clutter.
Every month or so, do a mini-declutter. Go through your drawers, closet, and surfaces to catch any items that no longer serve you. This prevents the need for another big decluttering session.
Practice mindfulness when it comes to acquiring new items. Before buying something new, ask yourself if you really need it and where it will live in your room.
Remember, perfection isn’t the goal. Life happens, and sometimes things will get messy. The key is to have systems in place that make it easy to get back on track.
Step 10: Celebrate Your Success
You did it! You’ve successfully decluttered your bedroom. Take a moment to stand back and admire your work. How does your new space make you feel? Lighter? More peaceful? Proud?
Now it’s time to celebrate your achievement. Treat yourself to something that complements your new space – maybe some fresh flowers, a scented candle, or a cozy new throw blanket. These small touches can help reinforce the calm, organized atmosphere you’ve created.
Share your success with friends or on social media. You might inspire others to start their own decluttering journey. Plus, making your achievement public can help motivate you to maintain your new organized space.
Most importantly, enjoy your new clutter-free bedroom. Revel in the ease of finding what you need, the peacefulness of a tidy space, and the satisfaction of a job well done. You’ve created a sanctuary for yourself – you deserve to enjoy it!
FAQs
Q: How long will it take to declutter my bedroom?
A: The time it takes to declutter your bedroom can vary depending on the size of your room and how much stuff you have. This guide is designed for a weekend project, but you might find it takes less or more time. The key is to work at a pace that feels comfortable for you. If you need to spread the task over several weekends, that’s perfectly fine.
Q: What should I do with items I’m unsure about?
A: For items you’re unsure about, create a “maybe” box. Put these items in the box and store it out of sight for a few months. If you don’t miss or need anything from the box during that time, it’s probably safe to let those items go. This method can make it easier to part with things you’re hesitant about.
Q: How do I maintain a clutter-free bedroom?
A: Maintaining a clutter-free bedroom is all about developing good habits. Make your bed daily, do a quick tidy-up each evening, and put things away immediately after use. Regularly reassess your belongings and be mindful about bringing new items into your space. Remember, it’s easier to maintain organization with small, consistent efforts than to let clutter build up and have to do a big cleanout.
Q: I’m feeling overwhelmed. Where should I start?
A: If you’re feeling overwhelmed, start small. Choose one area, like your nightstand or a single drawer, and focus on decluttering just that space. Seeing progress, even on a small scale, can motivate you to continue. Remember, any progress is good progress!
Q: How can I get motivated to start decluttering?
A: Visualize how you want your space to look and feel. Set small, achievable goals. Promise yourself a reward when you’re done. You could also invite a friend to help or join you in a decluttering challenge. Sometimes, just getting started is the hardest part – once you begin, you might find yourself motivated by the progress you’re making.
Summary
Decluttering your bedroom might seem like a daunting task, but with these 10 simple steps, you can transform your space in just one weekend. Remember, the goal isn’t perfection – it’s creating a space that serves you better and brings you peace.
Start with setting clear goals, gather your supplies, and work through each step at your own pace. Be ruthless with items you no longer need, creative with storage solutions, and mindful about maintaining your new organized space.
Your decluttered bedroom awaits! So why wait? Start your journey to a more organized, peaceful bedroom today. Your future self will thank you.